arlen holder
2019-04-22 03:15:17 UTC
Tutorial for creating custom Windows icons from screenshots using only Irfanview freeware
o Thanks to Jim on a.c.f, who supplied purposefully helpful IV suggestions.
<https://groups.google.com/d/msg/alt.comp.freeware/KCk4FpM9vZM/KEKUA6CqDAAJ>
<https://narkive.com/V4KyEyMa.2>
****************************************************************************
*How to screenshot an arbitrary image to create a custom shortcut icon*
(This tutorial describes how to create an icon with a transparent background
from any screenshot using a variety of software, where the initial goal was
to describe a method using _only_ Irfanview freeware.)
As always, please improve so that everyone benefits from every action.
****************************************************************************
============================================================================
*Basic Steps:*
A. Screenshot any desired image;
B. Set the background to be transparent, resize, & save as an ICO file;
C. Apply that icon file to an existing Windows shortcut.
NOTE: You can combine or skip some of the steps below which were broken out
in order to provide explanation simplicity, where the goal was to do it
all in Irfanview, which can be done, but the other tools do it better in
some cases (depending on the original image).
============================================================================
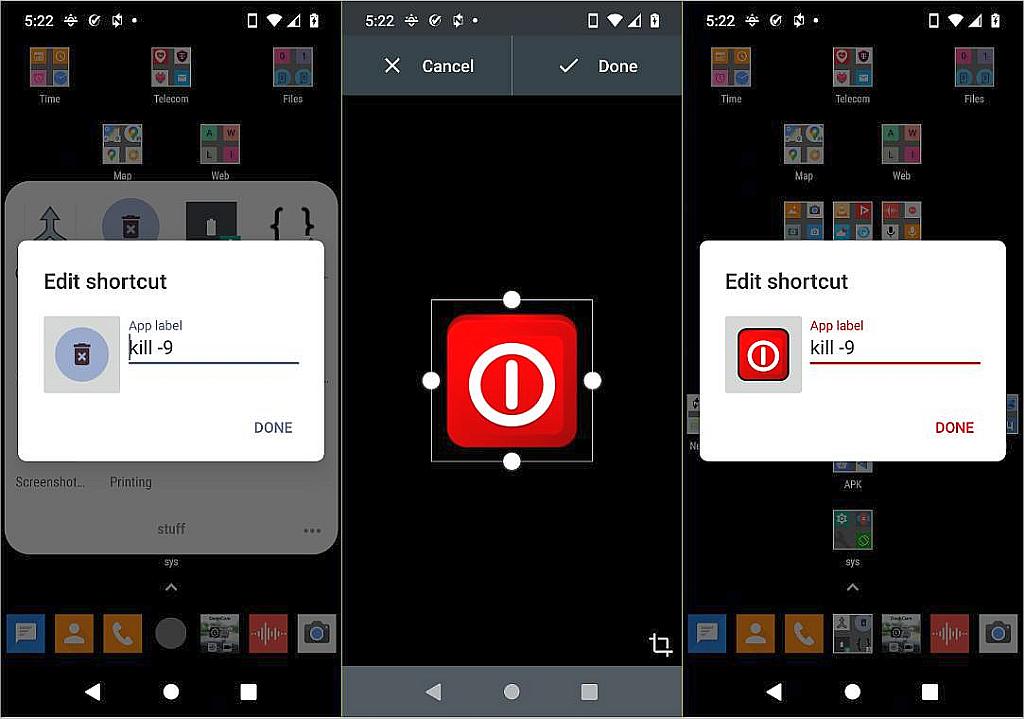
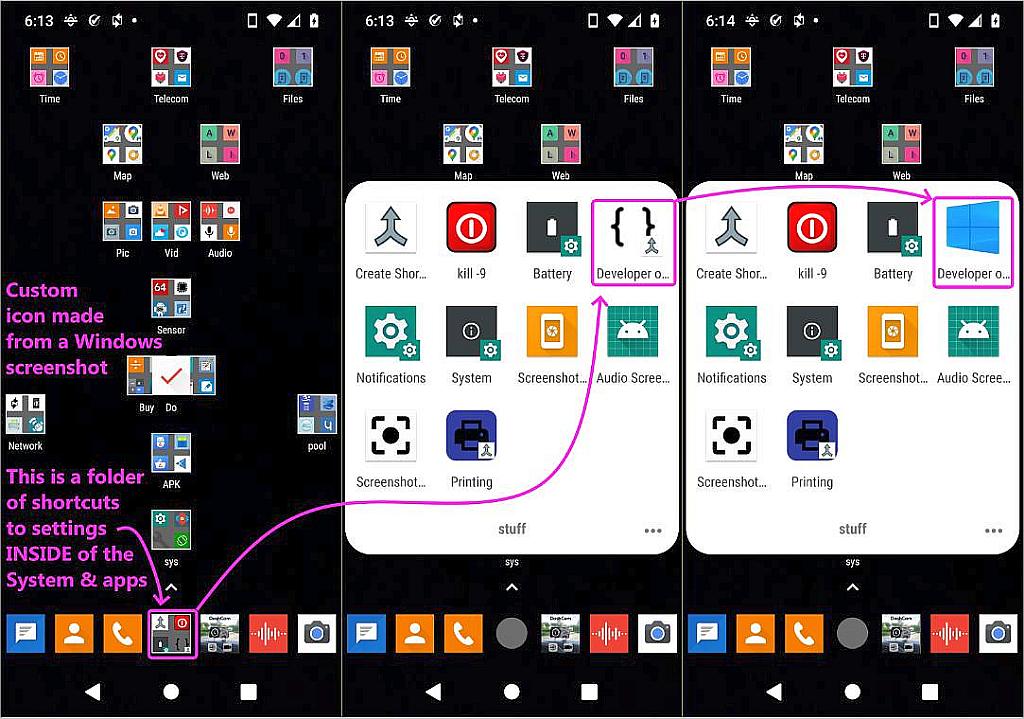
o *Create (or choose) a shortcut that you'd like to change the icon for.*
To create a test shortcut:
<https://www.digitalcitizen.life/how-create-shortcuts>
<https://www.thewindowsclub.com/create-desktop-shortcut-windows-10>
For my tests, I created two shortcuts, each with custom icons, for two tasks
o mount an encrypted volume as removable drive V: & open it up for viewing
o unmount all mounted encrypted volumes
Shortcut #1 target (mount a container as an encrypted removable drive):
C:\path-to\VeraCrypt.exe /volume C:\path-to\V.hc /letter V /auto /quit /explore
Shortcut #2 target (unmount all mounted containers):
o C:\path-to\VeraCrypt.exe /dismount /force
Note these shortcuts would otherwise default to the same Veracrypt icon
that the Veracrypt executable uses, which is harder to visually distinguish.
============================================================================
o *Determine your Windows system "Shell Icon Size" dimensions:*
Start > Run > regedit
HKEY_CURRENT_USER\Control Panel\Desktop\WindowMetrics
Shell Icon Size = 32
NOTE: This informs you of "Shell Icon Size" dimension, which was, in my
case, 32x32 pixels (yours may vary).
============================================================================
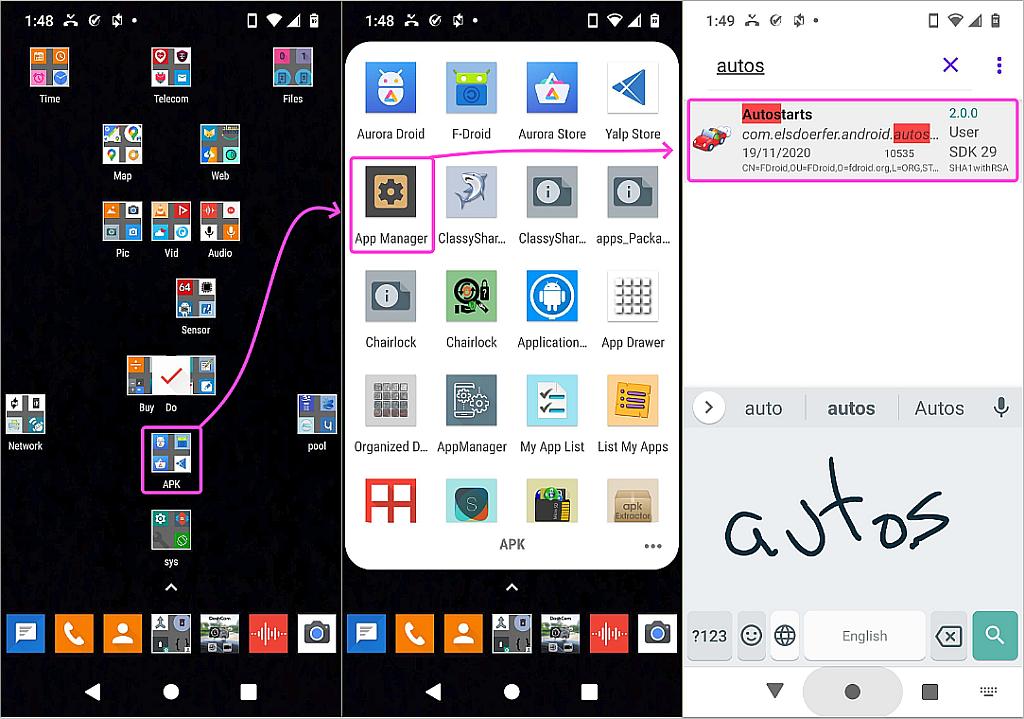
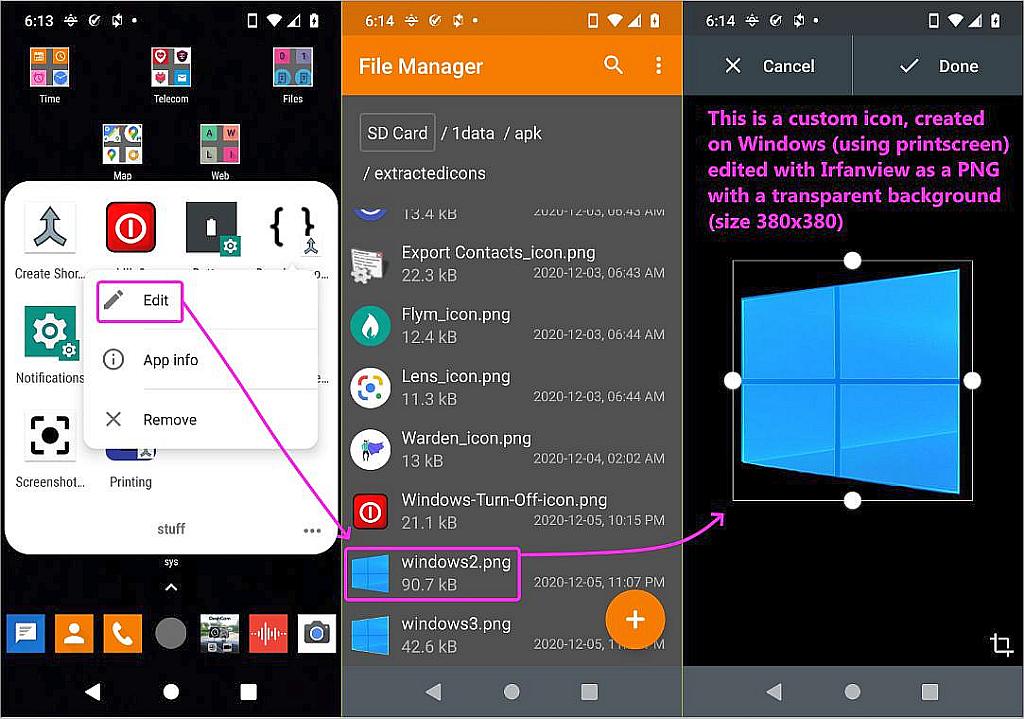
o *Screenshot any desired image (which will likely have an "uneven" background):*
(i.e., some background pixels may be various degrees of semi transparency.)
For example, snap a screenshot of this bank icon example on the net:
<https://pngtree.com/freepng/vector-bank-icon_3991558.html>
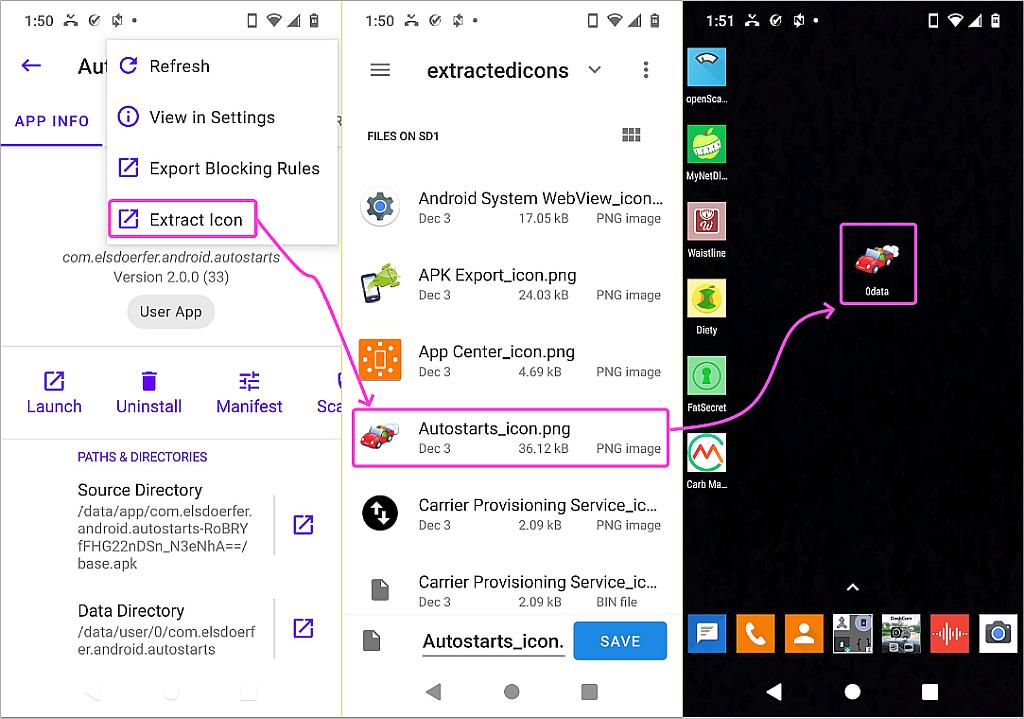
Open the screenshot in Irfanview freeware & modify as needed, e.g.,
o Crop using Irfanview LeftMouseButton click-click sweep & control+y
o Closecrop using Irfanview shift+control+y
o Save using Irfanview control+s to a png file.
(For example, save as an "icon_vault01_original.png" file.)
NOTE: This method assumes you don't have a ready-made icon file, where the
goal is to snapshot anything you want to convert to an appropriate icon,
and where the background of that snapshot may not be all the same color.
============================================================================
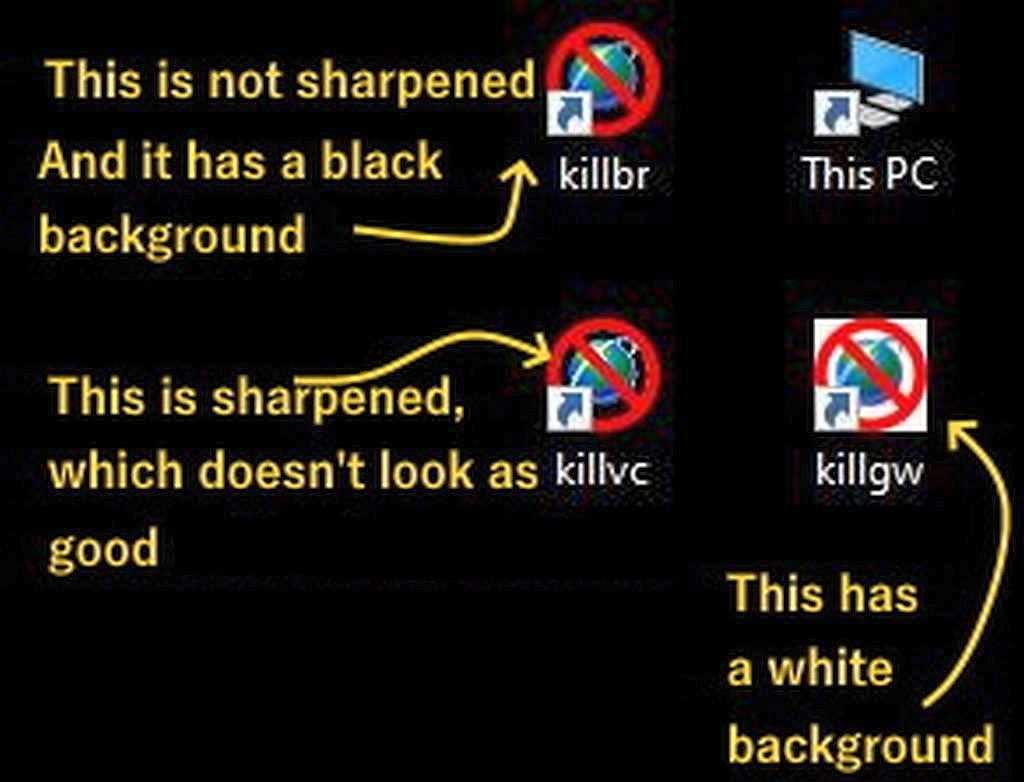
o *Set the background to be as transparent as you can using Irfanview:*
Open the image in Irfanview freeware (or any other desired software):
o In Irfanview, you can not draw an ellipse selection circle
o In Irfanview, use "Image > Replace Color" to replace the background
(white in this case) to a color not used elsewhere in the image
(black works fine for this image).
o If the background wasn't purely one color, the result may be "jagged"
When you save with Irfanview control+s to png or ico, check the
"Show options dialog" so that a form pops up, named:
"PNG/PNM/ICO save options".
In that form check "Save Transparent Color" for PNG and/or ICO.
Irfanview will then ask every time you save a file to that format:
"Choose transparent color"
"Click in the image to select the transparent color."
After clicking on the background area, save the file to PNG or ICO.
(For example, save as an "icon_vault01_transparent.png" file.)
----------------------------------------------------------------------------
o Or... set the background to be transparent using Paint.NET plugins:
Download the "Unblend - reverse normal blend" plugin zip file from:
<https://forums.getpaint.net/topic/28014-unblend-reverse-normal-blend-with-a-chosen-color/>
Unzip the downloaded zip file & note the "dll" & "cs" resulting files.
Place those two files into the Paint.NET "Effects" folder.
Open the image in Paint.NET freeware with the "Unblend" plugin installed.
o Set the color to be removed as the Primary Color (transparency value is ignored).
o In Paint.NET, select "Effects > Unblend".
o Save using Paint.NET control+s to a PNG file with transparency:
(For example, save as an "icon_vault01_transparent.png" file.)
NOTE: The background is now evenly transparent outside the selecton area.
Note: As always, there are other ways to perform the task, for example:
Open the image in Paint.NET freeware (or any other desired software):
o In Paint.NET, draw an ellipse selection circle around the foreground image
o Crop to that ellipse using Paint.NET control+shift+x
o Save using Paint.NET control+s to a PNG file with transparency:
(For example, save as an "icon_vault01_transparent.png" file.)
Bear in mind, according to users of that plugin, they feel inverse
alpha compositing is an underdefined problem, because the alpha value
of the result is not unique. A pixel could be made more intense with a
lower alpha, or less intense with a higher alpha, and still give the
correct result when blended back on the background color.
The Unblend plugin is said to use a greedy algorithm, whereby it always
uses the minimum permitted value of alpha for each pixel, so that as
much of the background color is removed as possible.
----------------------------------------------------------------------------
o Or... set the background to be transparent using The GIMP freeware:
Open the image in The GIMP (version 2.4.7 is what I used).
Change The GIMP "Image > Mode > RGB" if not already set.
Select The GIMP "Layer > Transparency > Color to Alpha..."
Select the background (in this case, white) as the color to make transparent.
Click "OK".
Use The GIMP shift+control+s to save the resulting image in PNG format.
(For example, save as an "icon_vault01_transparent.png" file.)
Note: As always, there are other ways to perform the task, for example,
in The GIMP, you can select the background via The GIMP magic wand or
The GIMP color tool & then apply a layer mask using the sequence:
"Layer > Mask > Add layer mask" & then "Selection > [x]Invert mask > Add".
----------------------------------------------------------------------------
o Or... set the background to be transparent using Adobe Photoshop payware.
In Photoshop, use "Select > Color range" and hold down the Shift key to
then click on the color you need to remove (white in this case). Press OK.
Then all your white will be selected; now hit delete.
============================================================================
o *Convert the PNG to a properly sized ICO file with a transparent background:*
Open the png file in Irfanview.
Resize to 32x32 pixels using control+r.
Save to an ICO file using control+s.
When you save with Irfanview control+s to ico, check the "Show options dialog"
so that a form pops up, named: "PNG/PNM/ICO save options".
In that form check "Save Transparent Color" for PNG and/or ICO.
Irfanview will then ask every time you save a file to that format:
"Choose transparent color"
"Click in the image to select the transparent color."
After clicking on the background area, save the file to PNG or ICO.
(For example, save as an "icon_vault01_32x32.ico" file.)
============================================================================
o *Apply that ICO icon to an existing shortcut:*
RClick > (shortcut) > Properties > Shortcut > Change Icon > [Browse] >
(For example, select your "32x32_icon_vault01.ico" file.)
Apply > OK > OK
NOTE: The Windows shortcut should immediately change to the desired icon.
============================================================================
============================================================================
ADDENDUM:
While this tutorial strived to use _only_ Irfanview freeware to create icons,
it is readily acknowledged there are many ways to obtain/create custom icons.
For example, one can point to any of about 16 large collections in Windows.
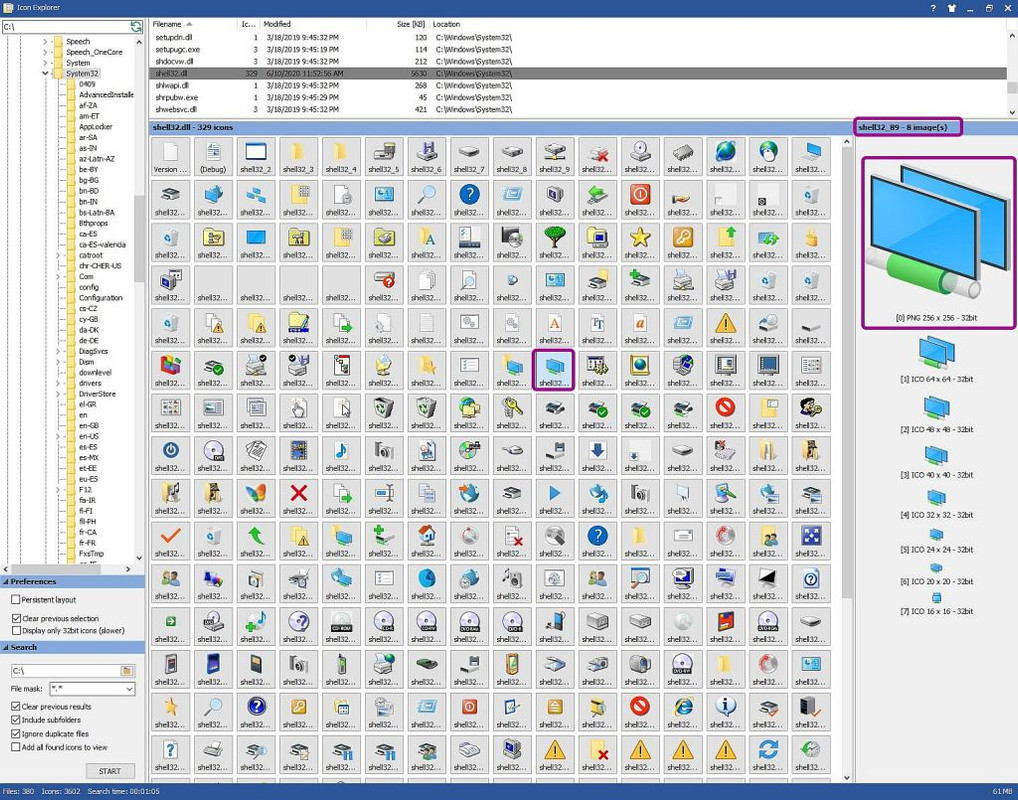
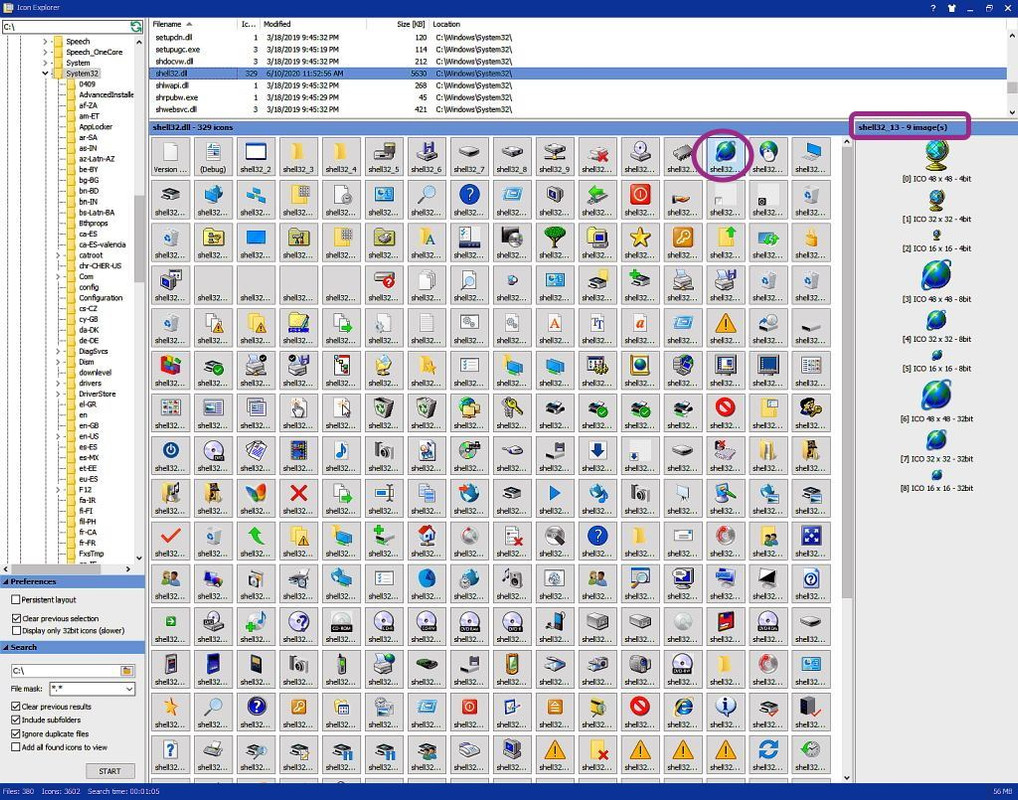
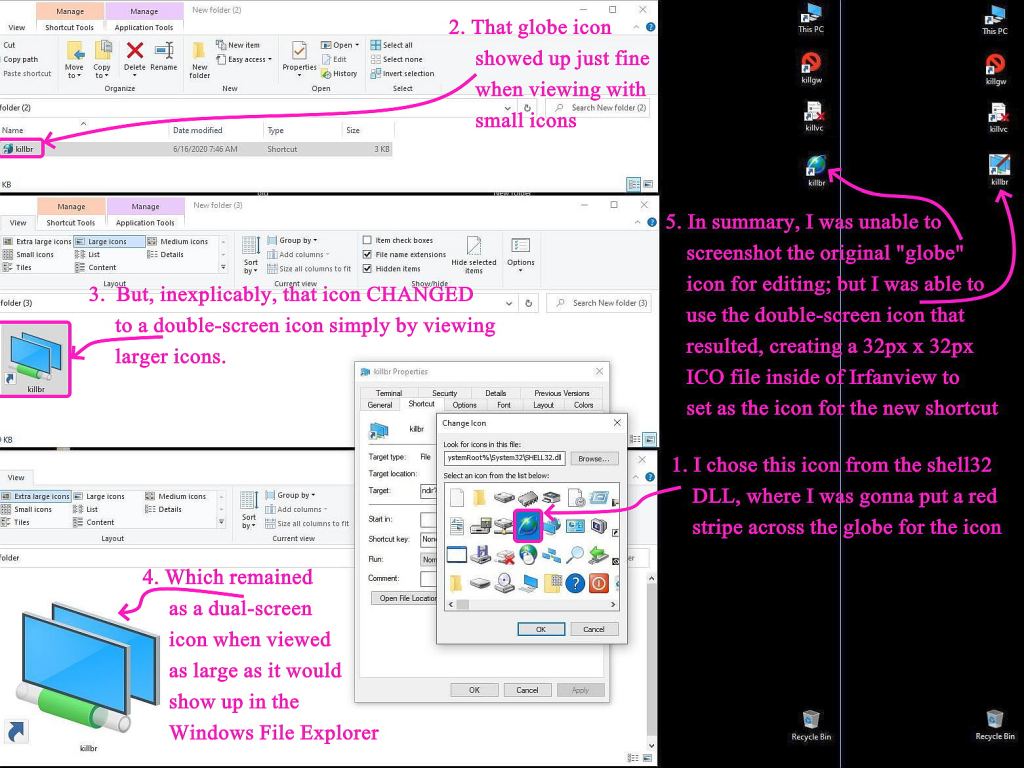
o C:\windows\system32\shell32.dll (default icon location)
o C:\windows\system32\imageres.dll (folders, devices, actions)
o C:\windows\system32\ddores.dll (hardware devices and resources)
o C:\windows\system32\pifmgr.dll (old-style icons of Windows 95 vintage)
o C:\windows\system32\inetcpl.cpl (old-style icons of Windows 95 vintage)
o C:\windows\system32\moricons.dll (old-style icons of Windows 95 vintage)
o C:\windows\system32\accessibilitycpl.dll (accessibility features icons)
o C:\windows\system32\mmcndmgr.dll (old-style computer management icons)
o C:\windows\system32\mmres.dll (audio speakers, headphones, microphones)
o C:\windows\system32\networkexplorer.dll (network connections & hardware)
o C:\windows\system32\netcenter.dll (network settings and features)
o C:\windows\system32\netshell.dll (network connections & hardware)
o C:\windows\system32\twinui.dll (twin screens icons)
o C:\windows\system32\mspaint.exe (paint-related icons)
o C:\windows\explorer.exe (file explorer icons)
o C:\windows\system32\gameux.dll (gaming icons)
etc.
Or one can choose from a plethora of ready-made icon packs on the net, e.g.,
o <https://sourceforge.net/projects/openiconlibrary/>
o <https://www.iconfinder.com/icons/43549/folder_private_icon>
o <https://all-free-download.com/free-icon/windows-icons-pack.html>
etc.
Or, one can convert any uploaded image to an icon via online converters:
o <https://icoconvert.com/>
o <https://online-converting.com/image/png-ico/>
o <https://www.coolutils.com/online/Image-Converter/>
etc.
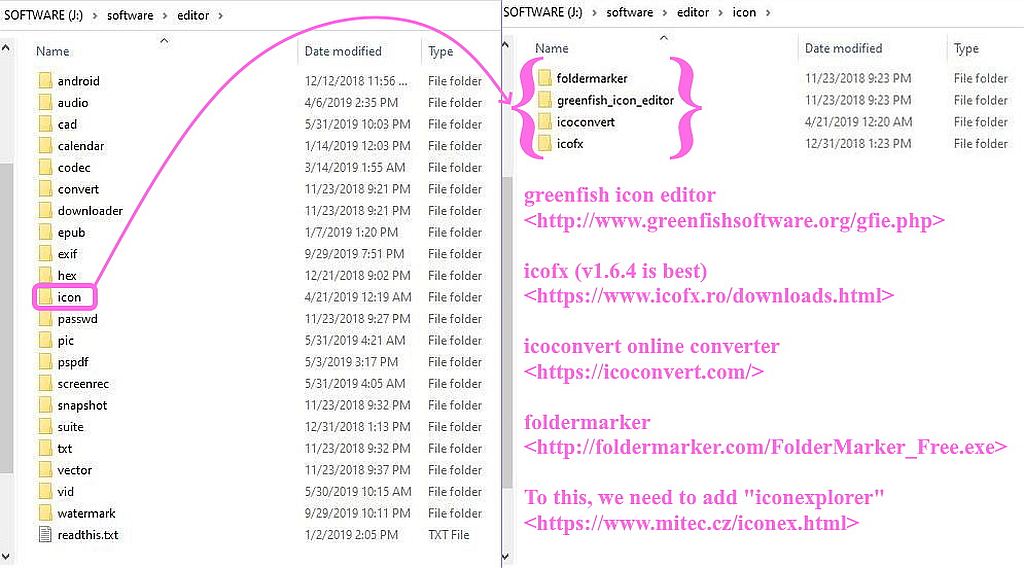
And, of course, there are purposefully built tools for this task:
o FxICO trialware <https://icofx.ro/>
o Greenfish freeware <http://www.greenfishsoftware.org/gfie.php>
o FolderMarker freeware <http://foldermarker.com/FolderMarker_Free.exe>
etc.
============================================================================
============================================================================
o Thanks to Jim on a.c.f, who supplied purposefully helpful IV suggestions.
<https://groups.google.com/d/msg/alt.comp.freeware/KCk4FpM9vZM/KEKUA6CqDAAJ>
<https://narkive.com/V4KyEyMa.2>
****************************************************************************
*How to screenshot an arbitrary image to create a custom shortcut icon*
(This tutorial describes how to create an icon with a transparent background
from any screenshot using a variety of software, where the initial goal was
to describe a method using _only_ Irfanview freeware.)
As always, please improve so that everyone benefits from every action.
****************************************************************************
============================================================================
*Basic Steps:*
A. Screenshot any desired image;
B. Set the background to be transparent, resize, & save as an ICO file;
C. Apply that icon file to an existing Windows shortcut.
NOTE: You can combine or skip some of the steps below which were broken out
in order to provide explanation simplicity, where the goal was to do it
all in Irfanview, which can be done, but the other tools do it better in
some cases (depending on the original image).
============================================================================
o *Create (or choose) a shortcut that you'd like to change the icon for.*
To create a test shortcut:
<https://www.digitalcitizen.life/how-create-shortcuts>
<https://www.thewindowsclub.com/create-desktop-shortcut-windows-10>
For my tests, I created two shortcuts, each with custom icons, for two tasks
o mount an encrypted volume as removable drive V: & open it up for viewing
o unmount all mounted encrypted volumes
Shortcut #1 target (mount a container as an encrypted removable drive):
C:\path-to\VeraCrypt.exe /volume C:\path-to\V.hc /letter V /auto /quit /explore
Shortcut #2 target (unmount all mounted containers):
o C:\path-to\VeraCrypt.exe /dismount /force
Note these shortcuts would otherwise default to the same Veracrypt icon
that the Veracrypt executable uses, which is harder to visually distinguish.
============================================================================
o *Determine your Windows system "Shell Icon Size" dimensions:*
Start > Run > regedit
HKEY_CURRENT_USER\Control Panel\Desktop\WindowMetrics
Shell Icon Size = 32
NOTE: This informs you of "Shell Icon Size" dimension, which was, in my
case, 32x32 pixels (yours may vary).
============================================================================
o *Screenshot any desired image (which will likely have an "uneven" background):*
(i.e., some background pixels may be various degrees of semi transparency.)
For example, snap a screenshot of this bank icon example on the net:
<https://pngtree.com/freepng/vector-bank-icon_3991558.html>
Open the screenshot in Irfanview freeware & modify as needed, e.g.,
o Crop using Irfanview LeftMouseButton click-click sweep & control+y
o Closecrop using Irfanview shift+control+y
o Save using Irfanview control+s to a png file.
(For example, save as an "icon_vault01_original.png" file.)
NOTE: This method assumes you don't have a ready-made icon file, where the
goal is to snapshot anything you want to convert to an appropriate icon,
and where the background of that snapshot may not be all the same color.
============================================================================
o *Set the background to be as transparent as you can using Irfanview:*
Open the image in Irfanview freeware (or any other desired software):
o In Irfanview, you can not draw an ellipse selection circle
o In Irfanview, use "Image > Replace Color" to replace the background
(white in this case) to a color not used elsewhere in the image
(black works fine for this image).
o If the background wasn't purely one color, the result may be "jagged"
When you save with Irfanview control+s to png or ico, check the
"Show options dialog" so that a form pops up, named:
"PNG/PNM/ICO save options".
In that form check "Save Transparent Color" for PNG and/or ICO.
Irfanview will then ask every time you save a file to that format:
"Choose transparent color"
"Click in the image to select the transparent color."
After clicking on the background area, save the file to PNG or ICO.
(For example, save as an "icon_vault01_transparent.png" file.)
----------------------------------------------------------------------------
o Or... set the background to be transparent using Paint.NET plugins:
Download the "Unblend - reverse normal blend" plugin zip file from:
<https://forums.getpaint.net/topic/28014-unblend-reverse-normal-blend-with-a-chosen-color/>
Unzip the downloaded zip file & note the "dll" & "cs" resulting files.
Place those two files into the Paint.NET "Effects" folder.
Open the image in Paint.NET freeware with the "Unblend" plugin installed.
o Set the color to be removed as the Primary Color (transparency value is ignored).
o In Paint.NET, select "Effects > Unblend".
o Save using Paint.NET control+s to a PNG file with transparency:
(For example, save as an "icon_vault01_transparent.png" file.)
NOTE: The background is now evenly transparent outside the selecton area.
Note: As always, there are other ways to perform the task, for example:
Open the image in Paint.NET freeware (or any other desired software):
o In Paint.NET, draw an ellipse selection circle around the foreground image
o Crop to that ellipse using Paint.NET control+shift+x
o Save using Paint.NET control+s to a PNG file with transparency:
(For example, save as an "icon_vault01_transparent.png" file.)
Bear in mind, according to users of that plugin, they feel inverse
alpha compositing is an underdefined problem, because the alpha value
of the result is not unique. A pixel could be made more intense with a
lower alpha, or less intense with a higher alpha, and still give the
correct result when blended back on the background color.
The Unblend plugin is said to use a greedy algorithm, whereby it always
uses the minimum permitted value of alpha for each pixel, so that as
much of the background color is removed as possible.
----------------------------------------------------------------------------
o Or... set the background to be transparent using The GIMP freeware:
Open the image in The GIMP (version 2.4.7 is what I used).
Change The GIMP "Image > Mode > RGB" if not already set.
Select The GIMP "Layer > Transparency > Color to Alpha..."
Select the background (in this case, white) as the color to make transparent.
Click "OK".
Use The GIMP shift+control+s to save the resulting image in PNG format.
(For example, save as an "icon_vault01_transparent.png" file.)
Note: As always, there are other ways to perform the task, for example,
in The GIMP, you can select the background via The GIMP magic wand or
The GIMP color tool & then apply a layer mask using the sequence:
"Layer > Mask > Add layer mask" & then "Selection > [x]Invert mask > Add".
----------------------------------------------------------------------------
o Or... set the background to be transparent using Adobe Photoshop payware.
In Photoshop, use "Select > Color range" and hold down the Shift key to
then click on the color you need to remove (white in this case). Press OK.
Then all your white will be selected; now hit delete.
============================================================================
o *Convert the PNG to a properly sized ICO file with a transparent background:*
Open the png file in Irfanview.
Resize to 32x32 pixels using control+r.
Save to an ICO file using control+s.
When you save with Irfanview control+s to ico, check the "Show options dialog"
so that a form pops up, named: "PNG/PNM/ICO save options".
In that form check "Save Transparent Color" for PNG and/or ICO.
Irfanview will then ask every time you save a file to that format:
"Choose transparent color"
"Click in the image to select the transparent color."
After clicking on the background area, save the file to PNG or ICO.
(For example, save as an "icon_vault01_32x32.ico" file.)
============================================================================
o *Apply that ICO icon to an existing shortcut:*
RClick > (shortcut) > Properties > Shortcut > Change Icon > [Browse] >
(For example, select your "32x32_icon_vault01.ico" file.)
Apply > OK > OK
NOTE: The Windows shortcut should immediately change to the desired icon.
============================================================================
============================================================================
ADDENDUM:
While this tutorial strived to use _only_ Irfanview freeware to create icons,
it is readily acknowledged there are many ways to obtain/create custom icons.
For example, one can point to any of about 16 large collections in Windows.
o C:\windows\system32\shell32.dll (default icon location)
o C:\windows\system32\imageres.dll (folders, devices, actions)
o C:\windows\system32\ddores.dll (hardware devices and resources)
o C:\windows\system32\pifmgr.dll (old-style icons of Windows 95 vintage)
o C:\windows\system32\inetcpl.cpl (old-style icons of Windows 95 vintage)
o C:\windows\system32\moricons.dll (old-style icons of Windows 95 vintage)
o C:\windows\system32\accessibilitycpl.dll (accessibility features icons)
o C:\windows\system32\mmcndmgr.dll (old-style computer management icons)
o C:\windows\system32\mmres.dll (audio speakers, headphones, microphones)
o C:\windows\system32\networkexplorer.dll (network connections & hardware)
o C:\windows\system32\netcenter.dll (network settings and features)
o C:\windows\system32\netshell.dll (network connections & hardware)
o C:\windows\system32\twinui.dll (twin screens icons)
o C:\windows\system32\mspaint.exe (paint-related icons)
o C:\windows\explorer.exe (file explorer icons)
o C:\windows\system32\gameux.dll (gaming icons)
etc.
Or one can choose from a plethora of ready-made icon packs on the net, e.g.,
o <https://sourceforge.net/projects/openiconlibrary/>
o <https://www.iconfinder.com/icons/43549/folder_private_icon>
o <https://all-free-download.com/free-icon/windows-icons-pack.html>
etc.
Or, one can convert any uploaded image to an icon via online converters:
o <https://icoconvert.com/>
o <https://online-converting.com/image/png-ico/>
o <https://www.coolutils.com/online/Image-Converter/>
etc.
And, of course, there are purposefully built tools for this task:
o FxICO trialware <https://icofx.ro/>
o Greenfish freeware <http://www.greenfishsoftware.org/gfie.php>
o FolderMarker freeware <http://foldermarker.com/FolderMarker_Free.exe>
etc.
============================================================================
============================================================================
--
Usenet is a Potluck Picnic where I try to add items of value for all.
Usenet is a Potluck Picnic where I try to add items of value for all.